How to Machine Embroider on Kitchen Towels - Easy Project for Beginner Level with Step by Step Instructions
Are you looking for an easy way to add some flair to kitchen towels? Then look no further! In this article, we'll show you how to machine embroider kitchen towels.
Kitchen towels come in different variations such as microfiber, bar towels, dish towels, terry cloth towels, flower sack towels. Also the tea towels that are lighter than kitchen towels.
They all can be embroider in the same way.
This is a beginner level tutorial, so if you just entered in the amazing and beautiful world of embroidery, then this tutorial is great for you. It is a fun project to make because kitchen towels fabrics are not stretchy, making them pretty easy to embroider on.
To embroider on a kitchen towel is very easy if you are using the correct supplies! Just follow the steps bellow!
There are many ways you can embroider a kitchen towel, but this is the one that we found to be the best looking and easy to make.
So let's start!

I. What do you embroider kitchen towels with?
To embroider on kitchen towels you will need the following supplies:
kitchen towel, stabilizers, embroidery design, chalk and ruler, scissors, thread
#1. Kitchen towel
What is the best kitchen towel to embroider on?
Kitchen towels come in different types of fabric: flower sack cotton, terry cloth, Waffle Weave, microfiber, etc. All work great for embroidery, you just need to wash, dry and iron before embroidery.
For our project we chose a simple cotton towel.
Important note: Always wash, dry and iron the towel before embroidery. This way you prevent the shrinking of the fabric and distortion of the design.
#2. Stabilizers
What stabilizer do I use on kitchen towels?
For this project we used a soluble stabilizer for the back stabilizer and for the front.You will need adhesive spray to secure the fabric to the back stabilizer.
The back stabilizer is a cut away stabilizer that dissolves in contact with water.
The top stabilizer is a thin wash away film.
These type of stabilizer let a clean and beautiful design on front as well as on the back.
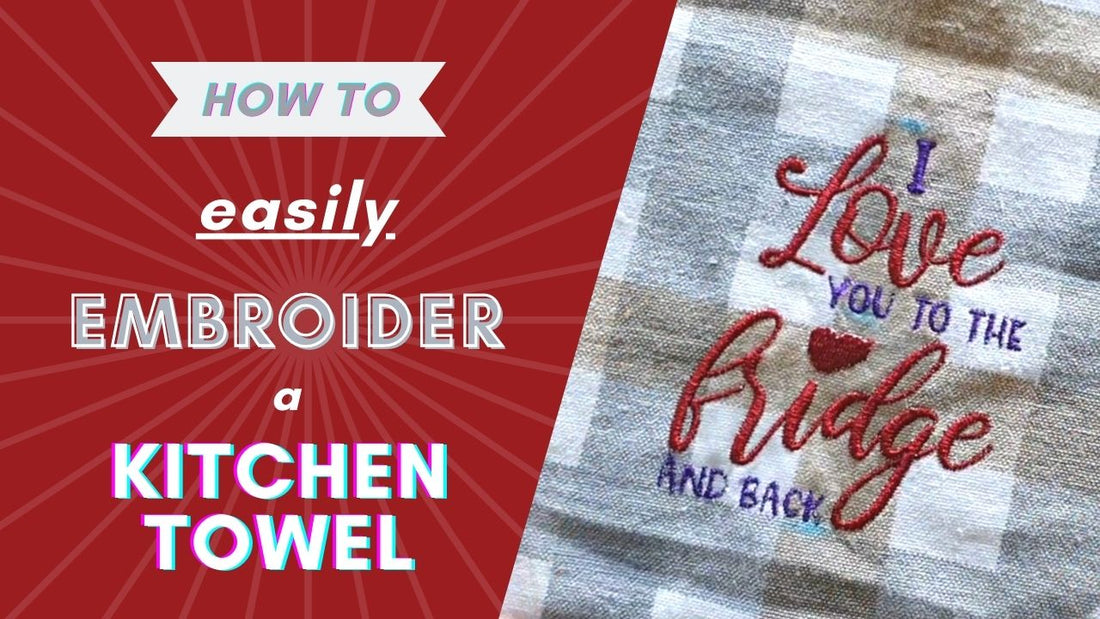
#3. Embroidery design
We used a free design that you can find here. But you can use any design you like for this project but be careful where you download your designs from because the digitizing of a design matters as well.
#4. Bobbin thread
We chose a standard white bobbin thread but you can choose it to be in the color of the towel. This way it will really look professional and premium.
#5. Measurements tools
Ruler and chalk or wash away pen to make the measurements.
II. Prepare for Embroidery
After you have your supplies it's time to prepare for embroidery.
As we said before, wash, dry and iron your kitchen towel.

#1. Embroidery Size
Where to embroider on a kitchen towel?
The first thing you need to consider is where you want to place the design. It can be on one side, on middle or maybe on a corner of the kitchen towel. We chose to fold the towel in 3, and to place the design so that it looks great when you hang it on the door of the oven.
Our folded part is approximately 6' wide by 10' tall. But we will leave margins of 1' on every side, leaving us with 4' width. We like having negative space around it, this make's it look more clean and beautiful.
#2. Embroidery Design
What embroidery design size should I use for kitchen towels?

Choose an embroidery design you like. The width must be a maximum 4'. For our designs, we offer documentation files. In these files you can see the exact size. So, for my design, I chose a 3' wide x 4' height. The 5' wide is too big for our personal taste.
Important note: You don't need to choose exactly as we do, some designs might work great as a 5' wide and also depends on your personal preferences.
#3. Measurements
How to measure and mark the kitchen towel for embroidery?
After figuring where we want to place the design, choose a design we like and the size we need, it's time to make the markings on the towel.
First, fold the towel in half. Use an iron if the towel doesn't fold properly.
From the bottom seam, measure 1 or 2 inches and mark. This represents the bottom part of the design.

Next, from the mark we just did, measure the height of the design and make another mark. This will be our top part of the design. Between these 2 marks will be our design stitched.
Find the center of the design by dividing the height by 2. Mark that point. This is the point we to align later to the machine's center point.

If your towel is bigger, has a big width, a template will work better. To make a template, on a piece of paper, draw a rectangle with the sizes of the design, then mark the middle of every side and join to find the center point just as we show you in our shirt embroidery tutorial.
#4 Add the stabilizer
How to stabilize a kitchen towel for machine embroidery?
As we said before we use a soluble stabilizer for the back and for the top. It also works with simple tear away stabilizer but it will not stitch as good and if your design has small gaps it will be very hard to tear the stabilizer away. With the soluble one, you just rinse the towel and the stabilizer it's gone! Another reason I like the wash away is that it is lighter than the tear way but much stronger, because it is a cut away type. It's just super cool and awesome to use!
Place the stabilizer on the table. Place the hoop you'll be using on top. Leave margins around the hoop and cut the stabilizer. This way you prevent cutting too small.

With the towel turned on the back, take the piece of stabilizer and place over where the design will be stitched. If you can t see the markings, make them again, on the back. The stabilizer must be placed on the center.
Take the hoop and put it over just to check and arrange the stabilizer if needed. After you know where to place, spray on the stabilizer or fabric and fix the stabilizer onto the fabric.
#5 Hooping the towel
How to put the hoop on a kitchen towel?
With the towel facing you, place the bottom part of the hoop under and use the markings to arrange so it feels centered. Next place the top part of the hoop over with the hoop's template. The hoop's template is needed when your hoop's center is not the center of the design. My 4 x 4 hoop doesn't have the center in the middle as the 5 x 7 hoop. Gently move the hoop until the center points and the up and down marks correspond with the hoop's template.

After this step, remove the top part of the hoop and place the top stabilizer. If you find it easier, don't remove the top part of the hoop. You can spray a bit of adhesive on the fabric and place the stabilizer over.

Close the hoop but not entirely. Gently pool the margins so that the fabric and stabilizer are tensioned correctly in the hoop. You don t have to pull so that you stretch the fabric, just until it looks good, no wrinkles. Close the hoop.
Important note: There is another way of hooping a kitchen towel. For that, you need to hoop the stabilizer only and float the towel. But this will be in another tutorial.
#6 Embroidery machine
How to set the machine embroidery for kitchen towels?
First check the machine for enough bobbin thread. You can choose a color that is the same with the towel. But check the specification of your machine, what type of bobbin thread your machine needs, what thickness, because using a thicker thread will affect the machine on long term.
For my project I used white bobbin thread because I have a light colored towel.
Hoop the machine but be careful not to have parts of the towel under the hoop. Also arrange the towel so it is center and doesn't pull the hoop because of it's weight.
With the embroidery design opened on the machine's display, check the orientation of the design. I rotate mine 90 degrees to the right so it stitches correctly.

Finally, check the threads order. To do so, you can use the documentation file provided, the machine's display or even a software to view the layers order of the design. Add the first thread and start the program. For home use machines, it will stop every time you need to change the thread.
#7 Finish the project
After the machine has completed the embroidery, unhoop, tear the top wash away stabilizer and cut the jumps on front and back.
Rinse the towel in water until there is no stabilizer. After you it is dry, iron the towel and you are done!

I really enjoyed making this easy and fun kitchen towel project. I hope you enjoyed this article too and learned something useful.
If you have any questions or want to share from your experience you are welcomed to use the comment section bellow.
Until next article,
Happy Stitching!
